When I discovered Laravel a few years ago, I was mainly a front-end dev professionally and buried in the millions of frameworks that seem to multiply every day. Another day, another framework that claimed to fix all your problems. Needless to say I was rather tired of it all, so when I learned that there was a framework for PHP – I was not exactly thrilled. But, I downloaded it anyway to test it out, because I’m a glutton for punishment — why else would I be a developer?
I ended up loving the framework. Sure, there are adjustments, and things I don’t want to do the laravel way because I’m stubborn, but I’ve adjusted. One of the things that I really appreciate is ease of multiple MySQL connections, which is a part of what I’m going to be talking about in this series of posts.
There is a frustrating lack of information if you don’t want to build your own blog tooling out on your site, and want to use WordPress for that functionality instead, like I do. Originally when I built the redesign for NJM in PHP/Laravel on 5.7, I used the built in WP API functionality with every intention of building out all of the front end nonsense for the blog part of the site. I never got back to actually finishing any part of that, and I learned new things before it even mattered, when working on Patternography, that would make it easier to do.
First, a warning: with this setup, you will not be able to use Envoyer for your deployments, or your blog will break for every publish.
Set up wordpress
Create a new Laravel project if you haven’t already, and create a blog directory in your public directory.
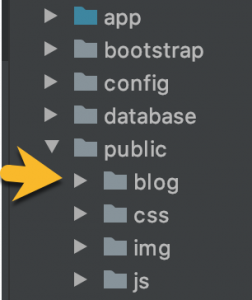
Next, download WordPress and drop all the files into your blog directory. If you already have a database you want to use, update the wp-config. When you go to yoursite.com/blog, you will then go through the normal WP setup process. If you let the WP set up handle creating the database, be sure to save the credentials, you’re going to need them.
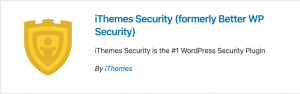
Login to your new WP back end and go to Plugins > Add New Plugin. Search for iThemes Security. It should be the first result and titled ‘iThemes Security (formerly Better WP Security)’. Install and activate.
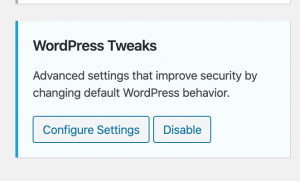
A new link (‘Security’) should appear with a notification in the top menu bar. Follow the prompts to get a free API key for your site. When that is complete, you should be dumped into the ‘Security’ menu item that appeared in your left menu. You’ll be in their settings menu at this point. Scroll down until you see ‘WordPress Tweaks’ and click on ‘Configure Settings’.
A new window will pop up. Scroll down until you see ‘REST API’. In the dropdown menu next to it, change ‘Default’ => ‘Restricted Access (recommended)’, then ‘Save Settings’.

Now, no one without a specifically defined access can get to your API. There are tools out there that will allow you to do a very similar thing to what I outline here (like Corcel), but you would need to set up access to your API with other plugins not outlined here.
The next post will discuss the Laravel set up needed to include WordPress in other parts of your site, other than at /blog.
You can read part 2 here.
One thought on “Laravel + WordPress Part 1: Setting Up WordPress”